How to take screenshots in Mac OSX
There are a number of ways to take a screenshot on Mac OSX. Each of the options have their own benifits, whereby you can take a snapshot of all connected screens, a selection or a particular interface element. Screenshots are great for reinterating a certain aspect of your screen to another person.
Screenshots are really easy to take on Mac OSX. There are a few third party programs that can take snap-shots of your screen, but Mac OSX can do the same and more. This guide will show you how to take the various screenshot types.
- Take a shot of the entire screen
- Screenshot a portion of your screen
- Screenshot of an active window
- Save a screenshot to the Clipboard
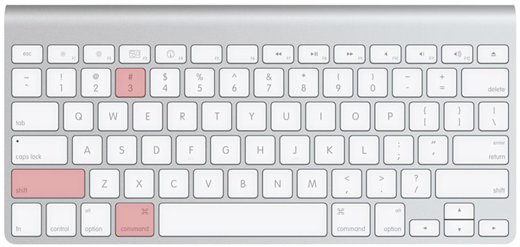
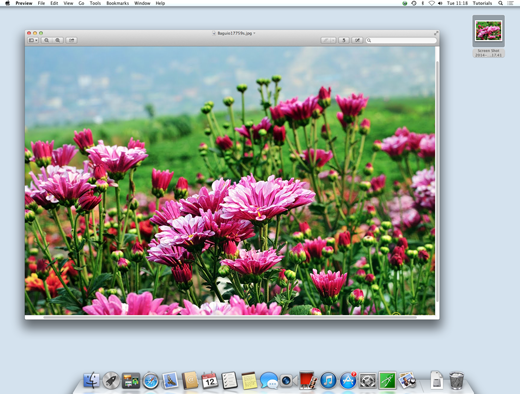
Take a screenshot of the entire screen back to top
- Make sure your screen is displaying the information you want to show in your screenshot. Be sure to check that all the relevant windows and dialogs are visible.
- Press ⌘ Command + ⇧ Shift + 3 on the keyboard. If your sound is turned on your machine will make a brief camera shutter noise. The image will then be saved to the Desktop.
- Locate your screenshot on the desktop. It will be saved as "screenshot" labeled with the date and time, however in some earlier operating systems the system will save it as "Picture #", where the hash sysmbol represents the screen shot number. For example if its the third screenshot on your desktop it will be named "Picture 3".
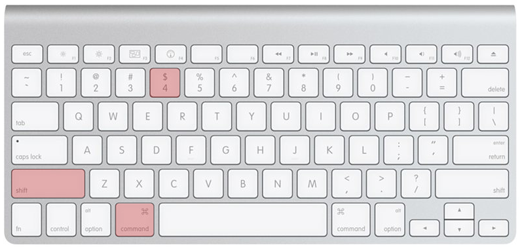
Screenshot a portion of your screen back to top
- Locate the section of the screen you want to take a screenshot of and check that the correct contents are visible.
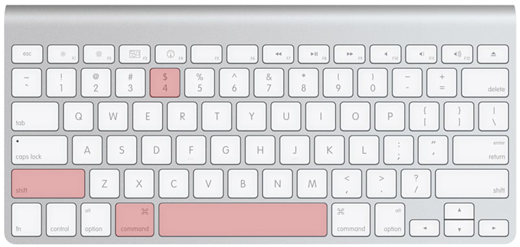
- Press ⌘ Command + ⇧ Shift + 4 on the keyboard. Your cursor will turn into a small cross-hair reticIe.
- Click and drag your cursor to highlight the area you'd like to take a screenshot of. A grayed out rectangle should appear where you have dragged the cursor. If you need to adjust your windows or want a different area, you can press the ⎋ ESC key to return to the normal cursor.
- Let go of the mouse and you will hear a brief camera shutter noise if your sound is turned on. This signals you that the screenshot has been taken.
- Locate your screenshot on the desktop. It will be saved as "screenshot" labeled with the date and time, however in some earlier operating systems the system will save it as "Picture #", where the hash sysmbol represents the screen shot number. For example if its the third screenshot on your desktop it will be named "Picture 3".
Screenshot of an active window back to top
- Make sure the window you want a screenshot is ready.
- Press ⌘ Command + ⇧ Shift + 4 then hit the Spacebar on the keyboard. Your cursor will become a small camera.
- Move the cursor over the window you want a screenshot of. Different windows will be highlighted blue as you move over them. You can use keyboard commands such as Command + Tab to move through windows.
- Click on the window you want a snapshot of and the picture will be saved to the Desktop.
- Locate your screenshot on the desktop. It will be saved as "screenshot" labeled with the date and time, however in some earlier operating systems the system will save it as "Picture #", where the hash sysmbol represents the screen shot number. For example if its the third screenshot on your desktop it will be named "Picture 3".

Save a screenshot to the clipboard back to top
- Make sure the window you want a screenshot is ready.
- Press ⌘ Command + ^ Control + ⇧ Shift + 3 on the keyboard. This will work in exatcly the same way as with original version, except the image will not be saved onto the Desktop, but will be copied to the clipboard. You can also use this with the options Press ⌘ Command + ^ Control + ⇧ Shift + 4 and with the Spacebar also.
- You can now use ⌘ Command + V or Edit > Paste to paste your image. Your image can be pasted into any compatible application such as word processing, image eiting or layout.

You should feel more comfortable with the Mac OSX screenshot facility. Expermiant with the different options, as each one is best suited to different situations.
Published by Microspot Limited - © Copyright Microspot Ltd 2014 All right reserved.
Follow Us:
Lt. Leon O. Cochran, USN (Ret.) - Microspot customer